Carts Drawer
Use the Carts Drawer as the hub of all your activity in the system.
The Carts Drawer provides quick and easy access to all carts you have access to within Title Source 360. Using the Carts Drawer effectively can streamline your workflow within the system. Use the carts drawer to:
The Carts Drawer is located on the left side of nearly every page in the system; it will follow you up and down pages as you navigate throughout Title Source 360. To open and close the Carts Drawer, click on the Carts Drawer handle.

When you open the Carts Drawer, a list of folders displays on the left. The folders in the white area contain your private cart folders; the folders in the gray area are system folders that contain shared carts, B&T-provided carts, ordered carts, and deleted carts. You cannot drag any carts out of your personal folders to any of the system folders, with the exception of the Deleted folder. Carts are kept in the system for 3 years.
To easily move a cart from one private folder to another, simply drag-and-drop the cart in question from the right side of the Carts Drawer to a different private folder on the left side of the Carts Drawer.

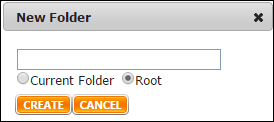
(1) - When you first access the Carts Drawer, you will have access to a Default Folder. You can opt to have all of your carts be sent to this folder, or you can create your own personal cart organizational system by creating new folders. Click the New Folder button to create a new private folder. In the associated pop-up window, give this new folder a name, and then decide if you want the folder to be a Root folder, or if you want it to be a sub-folder attached to the Current Folder you have selected. Click Create to instantly create your new folder.
(2) - To view all of the carts you have access to, click View All Carts. All of your carts will display on the right side of the screen, including those that have already been ordered, as well as those in a deleted status.
(3) - Your entire personal folder structure displays on the left side of the screen. All carts in the white area are private carts that only you can access. To rename your folder, click the pencil icon . To delete a folder, click the delete icon
  . Please note that if you delete a folder, you will delete all carts inside of that folder and/or sub-folder as well. You can easily restore these carts directly from the deleted folder, or you can simply drag-and-drop them to another folder before deletion.
(4) - System carts reside in the gray area within the Carts Drawer. You cannot move carts into any of the folders within the section, nor can you delete the folders themselves. Below is an explanation of each folder:
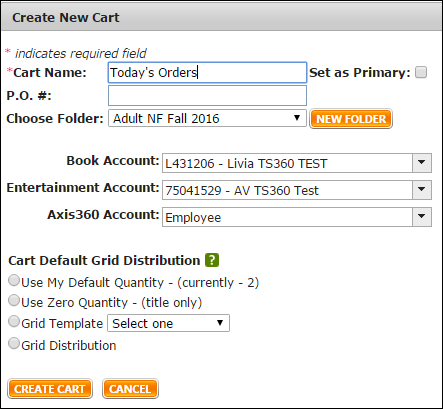
(5) - Click the New Cart button to bring up the cart creation pop-up window. From the below window, you can set the cart as your Primary cart, and even indicate which folder you want to send the newly created cart to once it has been created. Additionally, you can assign the accounts associated with this new cart, and assign a grid distribution.
(6) - Click Active/Recent to view your 5 Active carts and/or your 5 most recent carts in the right side of the Carts Drawer.
(7) - This area contains the carts stored inside the folder you have selected on the left side of the Carts Drawer.
- Quickly find and access any cart
- Create your own personal cart organizational system
- View high-level summaries for every cart
- Easily add grids to your carts
- Change your Primary Cart on the fly
- Activate and Inactivate carts to make them available when using the Add, Move, and Copy buttons
- Restore deleted carts with a single click
- Delete carts with a single click
The Carts Drawer is located on the left side of nearly every page in the system; it will follow you up and down pages as you navigate throughout Title Source 360. To open and close the Carts Drawer, click on the Carts Drawer handle.
When you open the Carts Drawer, a list of folders displays on the left. The folders in the white area contain your private cart folders; the folders in the gray area are system folders that contain shared carts, B&T-provided carts, ordered carts, and deleted carts. You cannot drag any carts out of your personal folders to any of the system folders, with the exception of the Deleted folder. Carts are kept in the system for 3 years.
To easily move a cart from one private folder to another, simply drag-and-drop the cart in question from the right side of the Carts Drawer to a different private folder on the left side of the Carts Drawer.
(1) - When you first access the Carts Drawer, you will have access to a Default Folder. You can opt to have all of your carts be sent to this folder, or you can create your own personal cart organizational system by creating new folders. Click the New Folder button to create a new private folder. In the associated pop-up window, give this new folder a name, and then decide if you want the folder to be a Root folder, or if you want it to be a sub-folder attached to the Current Folder you have selected. Click Create to instantly create your new folder.
(2) - To view all of the carts you have access to, click View All Carts. All of your carts will display on the right side of the screen, including those that have already been ordered, as well as those in a deleted status.
(3) - Your entire personal folder structure displays on the left side of the screen. All carts in the white area are private carts that only you can access. To rename your folder, click the pencil icon
(4) - System carts reside in the gray area within the Carts Drawer. You cannot move carts into any of the folders within the section, nor can you delete the folders themselves. Below is an explanation of each folder:
- Ordered & Submitted - Once you have submitted a cart for ordering, the cart will be automatically sent to this folder.
- Shared - Any cart that you have shared with others, or that someone else has shared with you, will be sent automatically to this folder.
- Received - Any cart that has been transferred to you from another user will be sent automatically to this folder.
- B&T/First Look - Contains any B&T provided carts, such as First Look, Axis 360, and Collection Development carts. This folder is called B&T Carts for retail customers.
- ESP - This folder will display only for organizations set up for our Premium ESP Service. You will not see this folder unless you have ESP.
- Archived - Use this folder as a place to store carts for safe-keeping, away from your more active carts in the white area of the Carts Drawer.
- Deleted - Contains your deleted carts. Carts will remain in a deleted status for 7 days before they are permanently removed from the system. To restore a deleted cart, simply drag-and-drop a deleted cart from the Deleted folder to one of the private folders you have created in the white area of the Carts Drawer. You can easily delete a cart from any folder by dragging and dropping that cart into the Deleted folder.
(5) - Click the New Cart button to bring up the cart creation pop-up window. From the below window, you can set the cart as your Primary cart, and even indicate which folder you want to send the newly created cart to once it has been created. Additionally, you can assign the accounts associated with this new cart, and assign a grid distribution.
(6) - Click Active/Recent to view your 5 Active carts and/or your 5 most recent carts in the right side of the Carts Drawer.
(7) - This area contains the carts stored inside the folder you have selected on the left side of the Carts Drawer.
- This icon indicates that the associated cart is your Primary cart. Your Primary cart is the cart you are using most often; think of it as your default cart. Items will be added to your Primary cart automatically when you click on the left side of the Add button. To make a different cart your Primary cart, click the dark blue shopping cart icon
next to the associated cart. That cart will move to the top of your folder, and will have the light blue Primary cart icon displaying next to it. Your Primary cart will also display when you hover over the Copy and Move buttons.
- This icon indicates that the associated cart is an Active cart. Active carts display in the fly-out window when hovering over the Copy and Move buttons, as well as when you hover over the right side of the Add button. You can assign up to 5 carts as Active. Click on the gray A icon
to turn it orange and activate your cart. If you have five carts activated and you try to activate a sixth cart, you must inactivate an existing active cart by clicking on the orange A icon
to turn it gray and inactive it first.
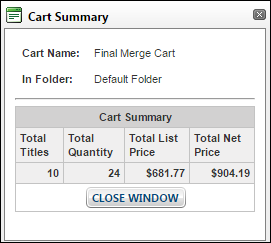
- Click this icon to view a high-level summary of the contents of your cart.
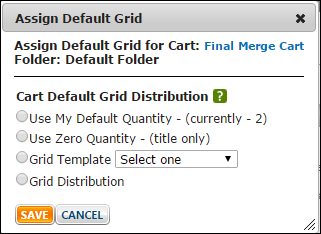
- Click on this icon to assign a default grid distribution to your cart. The following pop-up window will display.