Setting up New Grid Fields and Codes
Your organization's Grid Fields and Grid Codes can only be set up by users with Support Org functionality. Some B&T Technical Support and Sales Representatives also have this capability, so they can assist when necessary.
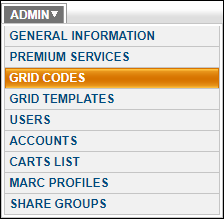
Select Grid Codes from the Admin drop-down at the top of every page.

You can hover over the Question Mark icon to view an explanation of individual Grid Field definitions.
Adding Grid Fields and Codes
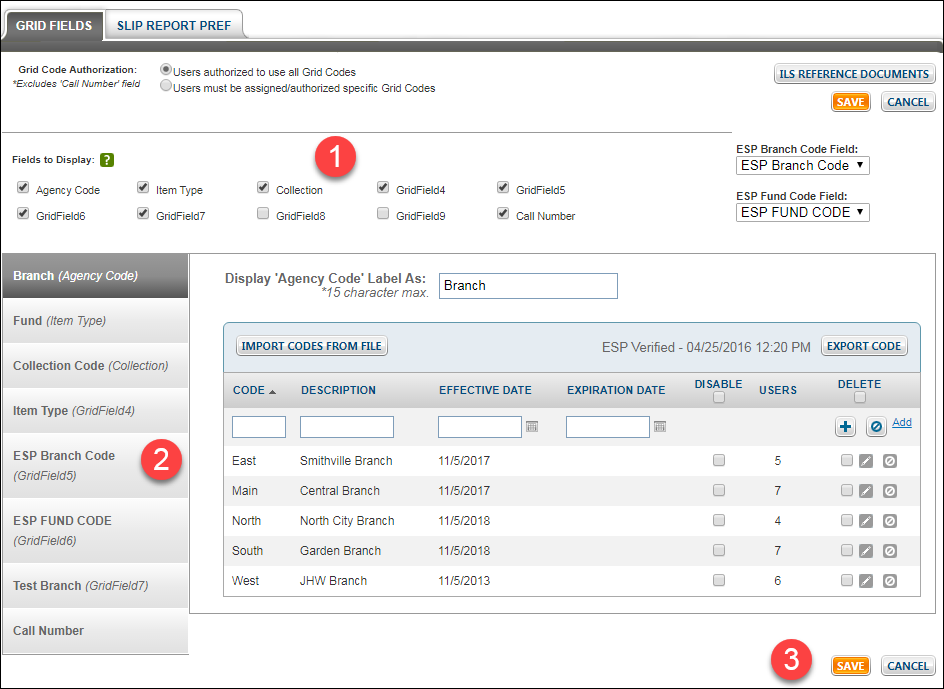
Click on the check box next to the associated Grid Field to enable it (1). Once enabled, the Grid Field is added to the tabbed navigational list of displayed fields (2). To remove a grid field from the navigational list, simply deselect the check box next to the Grid Field name and then click Save (3).

For easy Grid Code Management, you can create a description label for each Grid Field. The one exception is the Call Number Grid field, which is a free-text field with a 26 character limit.
If you use Grid Field 4 through Grid Field 7, you must rename them prior to proceeding.
1. Once a Grid Code has been added to the Navigational tab, select the Grid Code by clicking on the Grid Field name.
2. To add a new Grid Code, complete the following fields:
Code - The short name for the Grid Code. This field is required.
Description- Provide a description for the Grid Code. Restricted to 25 characters. If you don't enter a description, the Code in the previous field will be used for the description field.
Effective Date - We recommend selecting the current date, unless the code should be hidden from use until a future date (i.e., a Fund Code for the next fiscal year).
Effective Date - We recommend selecting the current date, unless the code should be hidden from use until a future date (i.e., a Fund Code for the next fiscal year).
Expiration Date - If the Grid Code should expire at some point, enter the expiration date here. If you want the Grid Code to be used indefinitely, leave this field blank.
3. Click the plus sign or the Add link to save the Grid Code. Click the Cancel button
  to cancel the action.

You can hover over the Question Mark icon
Adding Grid Fields and Codes
Click on the check box next to the associated Grid Field to enable it (1). Once enabled, the Grid Field is added to the tabbed navigational list of displayed fields (2). To remove a grid field from the navigational list, simply deselect the check box next to the Grid Field name and then click Save (3).
For easy Grid Code Management, you can create a description label for each Grid Field. The one exception is the Call Number Grid field, which is a free-text field with a 26 character limit.
If you use Grid Field 4 through Grid Field 7, you must rename them prior to proceeding.
1. Once a Grid Code has been added to the Navigational tab, select the Grid Code by clicking on the Grid Field name.
2. To add a new Grid Code, complete the following fields:
Code - The short name for the Grid Code. This field is required.
Description- Provide a description for the Grid Code. Restricted to 25 characters. If you don't enter a description, the Code in the previous field will be used for the description field.
Effective Date - We recommend selecting the current date, unless the code should be hidden from use until a future date (i.e., a Fund Code for the next fiscal year).
Effective Date - We recommend selecting the current date, unless the code should be hidden from use until a future date (i.e., a Fund Code for the next fiscal year).
Expiration Date - If the Grid Code should expire at some point, enter the expiration date here. If you want the Grid Code to be used indefinitely, leave this field blank.
3. Click the plus sign
